sudo apt-get install ffmpeg

NOTE: This website is alive and growing.
Rendering
Table of Contents
How to use the Render dialog
-
Open the Render dialog by going to File → Render…
-
In the first text box enter the Filename of the file you are going to create. Don’t worry about the extension: it’s written automatically. The arrow on the right opens a dropdown menu with recently used files. The magnifier on the right opens a dialog that can help you finding the location for your file. If no path is specified, the file will be stored in your home directory.
-
The Fileformat box let you choose the container format for your video. Note that the formats listed in the drop down menu are not ordered alphabetically.
-
Audio and Video checkboxes determine if audio or video or both are to be rendered. By default they are both unchecked.
-
The wrench icons next to the checkboxes go easily unnoticed but are very important because they let you set the compression, that is the codec for the stream. Tooltips say Configure audio compression and Configure video compression.
-
The checkbox Create new file at each label enables the rendering splitting the project in many separated files. It assumes you have set labels in the Program window to define the starting point of every file.
-
Render range lets you define which portion of the project you want to render. The default setting is Project: the whole project is rendered. By checking Selection only the highlighted area will be rendered. Check In/Out Points if you want to render the area defined by In/Out Points.
-
Tell Cinelerra what to do with the rendered file by selecting the Insertion strategy. Very likely you don’t want the rendered file to go back into the project. Insert nothing is the most commonly used option.
-
The Render profile box is there for your convenience. It helps you by keeping note of your favourite rendering settings. You can use it, for instance, for memorizing the rendering of the video stream when you render for DVD. Let’s try it. Select YUV4MPEG Stream as File Format. Click on the Render video tracks checkbox. Select Insert nothing as insertion strategy. Type DVD video stream in the Render profile box. Click on the Save Profile button. Now, change some rendering settings, just to mess things up. Open the Render profile drop down menu by clicking on the arrow on the right side of the Render profile box. Select the DVD video stream option you have just created and… voillà! You get all your settings back!
How to stop rendering
To interrupt a rendering operation in progress click on the cancel operation cross-shaped button on the bottom right of the program window.
How to choose the format for rendering
The list of formats you can choose for rendering is overwhelming. In fact you can do all your tasks with just a few formats, to be chosen depending on your target.
Unlike image formats, a video format is just a container. It contains a few streams, usually the audio stream and the video stream. Audio and video streams are encoded using different and various methods. Any specific method is called codec. A video format can contain different codec types. So when you choose the format for your video, you must choose also the codecs for the streams.
Here is a list of the recommended formats (and video codec/audio codec) for the most common uses:
-
To be viewed on computers with non-free operating systems:
-
For Windows: DVD-compliant MPEG-PS (MPEG2/AC3) or OGG (Theora/Vorbis) or AVI
-
For Mac: DVD-compliant MPEG-PS (MPEG2/AC3) or OGG (Theora/Vorbis) or MOV
-
-
To be burned on a DVD-Video: DVD-compliant MPEG-PS (MPEG2/AC3)
-
To be uploaded on the Internet:
-
For Internet Archive: DVD-compliant MPEG-PS (MPEG2/AC3) or OGG (Theora/Vorbis)
-
For Vimeo: DVD-compliant MPEG-PS (MPEG2/AC3) or MPEG4 (h264/ACC)
-
-
To be put back on a MiniDV tape: DV (RawDV/PCM)
When choosing the format also take in account that:
-
OGG (Theora/Vorbis) is an Open and Royalty-free Format, developed by xiph.org. It has an excellent ratio quality/size and it is very good for streaming. It’s free and open source software.
-
DVD-compliant MPEG-PS (MPEG2/AC3) is a proprietary format. It’s your chioce for DVD-Video.
-
MPEG4 (h264/ACC) is a proprietary format. It’s your choice for streaming videos from websites that doesn’t fully support OGG.
How to create a Master file
Sometimes - especially if you have an HD project - it can be useful to render a high quality copy of your project as a master from which to derive different files for different uses (internet, DVD…).
You create a master file in different ways. This is what I recommend to Grandmas:
High quality (and big size)
Open the render dialog and select the following parameters:
-
File Format: Quicktime for Linux
-
Audio:
-
click on the wrench icon to open the compression dialog.
-
Compression: MPEG-4 audio
-
Bitrate: 320 000
-
Quantization quality: 100
-
-
Video:
-
click on the wrench icon to open the compression dialog.
-
Compression: Motion JPEG A
-
Make sure both audio and video checkboxes are checked.
-
Render range: Project
-
Render profile: type Master
-
Insertion strategy: Insert nothing
Click on the Save profile button. You’ll find the saved setting in the Render profile dropdown menu for future re-use.
|
|
Sometimes Cinelerra gives you odd files, that appear to have wrong aspect ratio. They are all squeezed in your file manager thumbnails (Nautilus) and in Movie Player but they are OK when played in Cinelerra or VLC. I haven’t found a solution yet. Don’t worry too much: very likely your master file will be transcoded again before use. Most of the times that fixes the issue. |
Maximum quality (and huge size)
Open the render dialog and select the following parameters:
-
File Format: Quicktime for Linux
-
Audio:
-
click on the wrench icon to open the compression dialog.
-
Compression: Twos complement
-
Bits per channel: 16 Bit linear
-
Dither: leave unchecked
-
-
Video:
-
click on the wrench icon to open the compression dialog.
-
Compression: YUV 4:2:0 Planar
-
Make sure both audio and video checkboxes are checked.
-
Render range: Project
-
Render profile: type Best Master
-
Insertion strategy: Insert nothing
Click on the Save profile button. You’ll find the saved setting in the Render profile dropdown menu for future re-use.
|
|
Sometimes Cinelerra gives you odd files, that appear to have wrong aspect ratio or weird colours. There is no file manager thumbnails (Nautilus). They have wrong aspect ratio in Movie Player and can have inverted colours in VLC. In fact those files do have the proper resolution but they must have something wrong with aspect ratio flag that confuses some players. I haven’t found a solution yet. Don’t worry too much: very likely your master file will be transcoded again before use. Most of the times that fixes the issue. |
How to render you project to OGG format
Open the Render dialog and choose OGG Theora/Vorbis as File Format.
You can improve the video quality clicking on the Configure video compression wrench icon and moving the Quality slider, but remember that you are increasing the file size as well. As a guide, I just rendered 30 sec of MiniDV footage for you. Have a look at the file size (the smaller the better) and the bitrate (the higher the better quality) I got for some slider positions:
-
Max quality (63): size: 33.8 MB, bitrate: 9453 kb/s (just the best!)
-
Good quality (40): size: 13.4 MB, bitrate: 3752 kb/s (my favourite chioce for watching on my computer)
-
Good quality (30): size: 8.8 MB, bitrate: 2454 kb/s (my favorite choice for streaming)
-
Min quality (0): size: 2.5 MB, bitrate: 702 kb/s (my favourite choice for preview and testing)
Selecting Fixed quality instead of Fixed bitrate decrease the file size with no quality loss.
How to render you project to DV
DV format needs at least one video track and two audio tracks. If you have no audio tracks or only one, just add empty tracks with the Audio→Add track menu.
Only projects with resolution of 720x576 pixels and a framerate of 25 fps (PAL) can be rendered to Raw DV (or 720x480 pixels at a framerate of 30 fps for NTSC). Open the Format dialog with Settings→Format and make sure you project has PAL or NTSC settings.
Then:
-
Open the Render dialog and choose the Fileformat by clicking on the arrow and selecting Raw DV.
-
Change the Insertion strategy to Insert nothing. The other settings are the right ones by default.
-
Click on the green tick to start the rendering process. Cin should give you a file ending with a .dv extension.
How to put you movie back to MiniDV tape
This is a very easy thing to do thanks to that nice application called Kino. You can install it with Synaptic.
-
Turn your camera on, in playback mode. Make sure you have a recordable tape inserted.
-
Connect the camera to the computer with the Firewire cable
-
Restart your computer
-
Open your file in Kino or open Kino and load your file. If it is in DV format it will be loaded directly. If it is in other formats, Kino will kindly transcode it for you.
-
Click on the Export tab on you right.
-
Select IEEE1394 (that is the firewire). Check the bottom left of the Kino main window for errors about raw1394. In case, see the Troubles capturing from camera section of the Troubleshooting page.
-
Press the Export button at the bottom of the Export window to start writing to tape. You should see (and hear) your video on the screen of your camera during exporting.
How to render your project to DVD-compliant format
If you want to make a DVD out of your movies, you need your files in VOB format that is very much like standard MPEG-2. Cinelerra can’t render your project directly into VOB format. She need the help of other program-friends. Here are two possible ways of getting a DVD-compliant file, ready to be used in DVD authoring programs.
From Cinelerra
You have to render audio and video in Cin separately and then use ffmpeg to unite (mux) the two streams and produce a single DVD-compliant file. ffmpeg is a command line application that you use by typing in the terminal instead of clicking on icons. It’s much easier than it looks and is very flexible (e.g. you can change standard).
-
Render you project to get the audio stream.
-
Open the Render dialog
-
Click on the arrow by the Render profile textbox and select audio stream for DVD from the drop-down menu. If you can find the audio stream for DVD entry, see the note below.
-
Enter the filename for your file mymovie before the .wav extension, at the top of the window.
-
Click on the green tick to start the rendering process. Cin should give you an audio-only file called mymovie.wav, saved in your home folder.
-
-
Render you project to get the video stream. Just follow the above procedure with only small changes:
-
Select video stream for DVD from the drop-down menu of the Render profiles.
-
Enter the filename for your file mymovie before the .m2v extension, at the top of the window.
-
Rendering should give you a video-only file called mymovie.m2v, saved in your home folder.
-
-
Install ffmpeg. In Ubuntu, just open a terminal and type:
-
It’s now time to mux the two streams into a single file.
Copy and paste in the terminal one the following commands, depending on your standard. Replace mymovie with your filename. Press ENTER to start the encoding.-
for PAL DVDs:
ffmpeg -i mymovie.wav -i mymovie.m2v -target pal-dvd -r pal mymovie.mpg
-
for NTSC DVDs:
ffmpeg -i mymovie.wav -i mymovie.m2v -target ntsc-dvd -r ntsc mymovie.mpg
-
You final file mymovie.mpg is a VOB-like file that can be used for DVDs.
|
|
The audio stream for DVD and the video stream for DVD render profile are not part of the official CinelerraCV. I made them available for Grandmas that downloaded the Grandma settings file. To know more see the settings page. |
|
|
You can get maximum image quality (and file size) adding the option -qscale 1 to the command, just before the output filename |
|
|
When rendering projects with odd resolution (1056x704 in my case) Cinelerra gives .m2v files with wrong aspect ratio. If this is your case, get your DVD-compliant file by converting it from another format. |
Converting from another format
In some cases you might want to create your DVD-compliant file by conversion from another format.
Render your project to a Master file first (Raw DV is OK for SD projects).
Then convert your master file using one of the following recipes. As often happens, working with the GUI might seems friendlier, but using the command line is quicker and often ensures better results.
Using the command line - ffmpeg
-
Install ffmpeg with the following terminal command:
sudo apt-get install ffmpeg
-
Open a terminal.
-
If you master file is not in your home directory, enter the directory that contains your master file with the following command (adjust the directory name to your case):
cd directoryname
-
Convert your master file with the following command, depending on your standard:
-
for PAL
ffmpeg -i mymasterfile.mov -target pal-dvd mydvdcompliantfile.mpg
-
for NTSC
ffmpeg -i mymasterfile.mov -target ntsc-dvd mydvdcompliantfile.mpg
Using the Graphical User Interface (GUI) - Kino
This recipe is recommended for DV files only. If you have another format, Kino will convert your file to DV first, adding an unwanted conversion.
-
Install Kino. In Ubuntu you can easily do that using the Ubuntu Software Center or Synaptic package manager.
-
In Cinelerra render your project to Raw DV format.
-
Start Kino. To load your file in Kino simply drag your file from the file manager to the Kino Storyboard left panel. Alternatively go to File → Open to open the dialog box. Browse your files and double click on mymovie.dv.
-
Click on the Export tab on your right. The window you just opened has six tabs at the top (to view all maximize Kino window).
-
Click on the MPEG tab.
-
Enter the filename for the final file.
-
Select 8 - DVD as File format. Leave all the other settings as they are.
-
Press the Export button to start the conversion. Kino will create two temporary files, an audio file with .mp2 extension an a video file ending with .mpv. At the end of the conversion they will be replaced by a single .mpeg file.
-
This final file mymovie.mpeg is a VOB-like file that can be used for DVDs.
Using the Graphical User Interface (GUI) - DeVeDe
-
Install DeVeDe. In Ubuntu you can easily do that using the Ubuntu Software Center or Synaptic package manager.
-
Open DeVeDe and select the Video DVD option.
-
Drag your master file from your file manager to the DeVeDe Files right panel. Alternatively click on the right panel Add button and select your file.
-
Uncheck che Create a menu with the titles option.
-
Open the Advanced Option panel.
-
Select Only convert film files to compliant MPEG files in the Action area.
-
Click on Forward to select the destination folder for your file.
-
Click on OK to start the conversion.
The resulting file will have an odd name (something like movie_01_01.mpg). Rename and move it at will.
How to mux audio and video stream changing standard
When muxing audio and video streams for DVD, you can also change standard in the same pass using one of the following commands:
-
From PAL to NTSC:
ffmpeg -i mymovie.ac3 -i mymovie.m2v -target ntsc-dvd -r ntsc -s 600x480 -padleft 60 -padright 60 mymovie.mpg
-
From NTSC to PAL:
ffmpeg -i mymovie.ac3 -i mymovie.m2v -target pal-dvd -r pal -s 720x480 -padtop 48 -padbottom 48 mymovie.mpg
How to join (concatenate) several files into a single one
For a better Cinelerra workflow, it is recommended to keep your projects as small as possible, splitting it in several separated scenes, edited and rendered separately. Scenes can be joined afterwards.
Since formats are technically different, every format has its own concatenation method. Concatenating is always much quicker than rendering, since it is just a particular kind of copying.
RawDV files
The DV format compresses the frames individually and the concatenation is very straightforward.
Using Cinelerra
You can load in Cinelerra all your just rendered .dv scenes in one single move. Just select all your files and use the Replace current project and concatenate tracks insertion method from the Load dialog. Your files will be loaded in alphanumeric order.
Render this temporary project to RawDV. This will be no real rendering, with no preview in the Compositor.
Using the Command Line - cat
As usual, the command line is the quickest way to go.
cat is a command for conCATenating files. For other uses of cat see the Linux Information Project.
Here is a terminal command you can use. Replace the filenames with the names of your video files.
cat myfile1.dv myfile2.dv myfile3.dv > mytotalfile.dv
The quickest way of writing the list of files to be joined is:
-
Highlight the list of files on the File Browser window
-
Drag the selected list and drop it anywhere inside the terminal.
If a file exists with the same name of the destination file, that file will be mercilessly overwritten with no warning.
OGG Theora/Vorbis files
Ogg Theora video files have timestamps in them, on which some players rely. If you join the files using cat the timestamps are not correctly altered and the players may throw errors.
Compiling and using Ogg Video Tools
To properly join OGG files you need a little utility Ogg Video Tools. Unfortunately you can’t install it with Synaptic. Actually you have to compile it yourself. Don’t panic: it will be painless and quick.
-
First, get the source code from the Sourceforge page. Click on the link ending in .tar.gz (called something like oggvideotools-0.7b.tar.gz). Save the archive file in your home folder.
-
Right click on the oggvideotools-0.7b.tar.gz archive icon and select Extract here. This will create a folder called oggvideotools-0.7b.
-
Enter the source folder, that is open a terminal and type cd oggvideotools-0.7b and press ENTER.
-
Give the command
./configure
-
Now give
make
-
Finally give the command
sudo make install
Congratulations! You have now Ogg Video Tools installed.
To join your OGG files, simply use the following command:
oggCat completefilm.ogv 'scene1.ogg' 'scene2.ogg' 'scene3.ogg'
Note:
-
replace completefilm.ogv with your target filename and scene1.ogg with your scenes filenames
-
.ogv is the recommended extension for OGG Theora/Vorbis files. Cinelerra is not up to date on that.
DVD-compliant .mpg video files
If you are going to put your video on a DVD be aware that:
-
you can keep the scenes separated and author them as chapters of the same title. To make DVDs from chapters I recommend the CL program dvdauthor or GUI programs like DeVeDe or the more advanced Qdvdauthor.
-
Since MPEG-2 compression uses keyframes, .mpg files have headers that contains supplemental data. Thus concatenating files with cat is not enough to produce correct DVD compliant MPEG-2 video streams. .mpg files joined by cat can be played back by most players but can’t be used for DVD authoring.
Using the Graphical User Interface - Avidemux
Avidemux can be easily installed using Synaptic Package Manager. It will be listed under Applications → Sound & Video menu.
-
Launch Avidemux, click on Open to browse your video files.
-
Select the first .mpg file of your list. Click on Open. You’ll be asked:
-
This looks like mpeg. Do you want to index it? Answer: Yes!
Indexing will take few minutes, depending on the file size. -
There is several mpeg file, append them? Answer: Yes!
This option is useful only when the .mpg files to be joined are in ordered sequence inside the same folder. Otherwise, you’d better use the Append command available in the File menu. This way you can manually append every single file.
-
-
Once the indexing and the appending are done, you can preview the video with the transport controls at the bottom left.
-
Choose the format of your destination file, using the controls on your left.
-
Video: Copy
-
Audio: Copy
-
Format: MPEG PS A+V
-
-
Click on Save to actually save the single, joined file. Select the destination Name and click on Save.
Check that during encoding the streams are just copied (and not re-encoded) and the Container is MPEG DVD. The operation is usually pretty quick. If the encoding seems stuck it is possible that you have not enough space left on disk.
Always check that all the files are appended.
The resulting .mpg file is a DVD compliant MPEG-2 video streams and can be used for DVD authoring.
How to render your project for Vimeo (MPEG4 h264/ACC)
Files encoded with h264 video codec and ACC audio codec, wrapped in a MPEG4 container format have very small size and very good quality. That’s why they are Vimeo favorites. See the Vimeo Compression Guidelines. Pity they are proprietary formats.
Unfortunately Cinelerra rendering to h264 is broken. Waiting for this bug to be fixed, here is a workaround: you can render to Raw DV (SD only), to a High Quality Master file (MOV container with MJPEG/MPEG-4 Audio), to a Maximum Quality Master File (MOV container with uncompressed video) or to DVD-compliant MPEG-PS (MPEG2/AC3) and then convert the resulting file.
For the first steps see How to create a Master file or How to render your project to DVD-compliant format.
For the conversion, you can use the command line (ffmpeg) or the GUI (Handbrake or Avidemux). It is recommended you resize the video to the size preferred by Vimeo, so to enjoy the full quality offered by that hosting site.
The converted/resized file can be uploaded to Vimeo. You may want to add it to the Cinelerra Vimeo Group.
Using the Command Line (CL) - ffmpeg
ffmpeg is very tolerant and so kind to work with any format.
Install ffmpeg with the following terminal command:
sudo apt-get install ffmpeg
To convert your master file, use one of the following commands, adjusting the input filename master.mov and the output filename ReadyForVimeo.mp4 to your case.
For standard definition 4:3 video:
ffmpeg -i master.mov -ab 320k -ar 44100 -vb 2000k -vc libx264 -s 640x480 -aspect 4:3 ReadyForVimeo.mp4
For standard definition 16:9 video:
ffmpeg -i master.mov -ab 320k -ar 44100 -vb 2000k -vc libx264 -s 640x360 -aspect 16:9 ReadyForVimeo.mp4
For high definition 720p video:
ffmpeg -i master.mov -ab 320k -ar 44100 -vb 5000k -vc libx264 -s hd720 -aspect 16:9 ReadyForVimeo.mp4
For high definition 1920×1080 video:
ffmpeg -i master.mov -ab 320k -ar 44100 -vb 5000k -vc libx264 -s 1920×1080 -aspect 16:9 ReadyForVimeo.mp4
Let’s have a look at the ffmpeg options.
-ab 320k: sets the audio bitrate to 320k
-ar 44100: sets the audio samplerate to 44100
-vb: sets the video bitrate to 2000k for SD and to 5000k for HD. This is the main parameter for image quality. The higher the better, the higher the bigger. Be careful: if you go over the given limits, Vimeo might not upload you file.
-vc libx264: sets the target codec to h264 (using x264, the free software library for encoding video streams into the H.264/MPEG-4 AVC format)
-s: sets the size (resolution) to 640x480 pixels for 4:3 SD, to 640x360 for 16:9 SD, to 1280x720 for 720p HD and to 1920×1080 for full HD.
-aspect: sets the display aspect ratio to 4:3 or 16:9. This option is needed only to fix the MOV master file aspect ratio issue (see above).
|
|
Those commands have been tested only on ffmpeg version 0.6.6. Ffmpeg is advancing so at a fast pace that options become quickly obsolete. To know your version of ffmpeg use the command: ffmpeg -version If something goes wrong, consult the ffmpeg help for the most up to date options with: ffmpeg -h | less Exit the help with q |
Using the Graphical User Interface (GUI) - Handbrake
To install Handbrake, copy and paste the following terminal commands, one at the time:
sudo add-apt-repository ppa:stebbins/handbrake-releases
sudo apt-get update
sudo apt-get install handbrake-gtk
|
|
Sometimes Handbrake new packages are not available immediately after an Ubuntu release. In that case you might want to try installing unstable Handbrake (that is the work-in-progess version), with the following commands: sudo add-apt-repository ppa:stebbins/handbrake-snapshots sudo apt-get update sudo apt-get install handbrake-gtk Remember: Unstable applications can have some defects. Officially they are only recommended for experienced users and developers. |
Handbrake will be available from the Applications → Sound & Video menu (Gnome) or in the Application lens (Unity).
You can convert your file in 10 steps:
-
Load your file from the File→Source menu.
-
Make sure the Destination folder is the correct one.
-
On the right panel, select the Regular→Normal preset.
-
In the bottom panel, in the Video tab you have two optios:
-
if your video is shorter than 15 minutes and you want the best quality: Enable Bitrate (kbps) and type 2000 for SD and 5000 for HD.
-
if the size of your file risks to pass the 500MB limit of the free Vimeo account: Enable Target size (MB) and type 480
-
-
Enable 2-Pass encoding
-
Move to the Audio tab
-
Select the AAC (Faac) codec
-
Select 320 as Bitrate
-
Select 44.1 as Sample rate (it might be among the Advenced options)
-
Go to File→Preferences and disable the Use iPod/iTunes friendly (.m4v) file extension for MP4 option.
-
Start the encoding clicking on the green square button at the top.
-
Have a coffee and be patient!
While you wait for the conversion to finish you you can save for future use the parameters you’ve just set.
-
Click on the floppy disk symbol below the Presets panel.
-
Enter Vimeo as Preset name and some clever words in the description field.
-
Press OK. You have now a new preset Vimeo listed in the Presets panel.
|
|
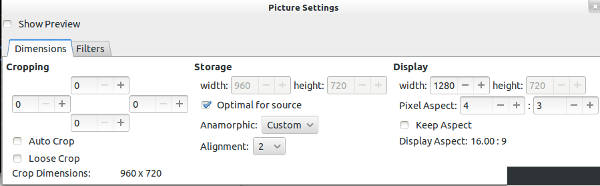
In case of MOV files with wrong aspect ratio, you can fix the problem with the Picture Settings function available from the button bar. CROPPING:
STORAGE:
DISPLAY:
The picture below shows the correct settings to fix an anamorphic HD video. .
|
Using the Graphical User Interface (GUI) - Avidemux
Avidemux works best with DVD-compliant MPG files. MOV and DV master files are not supported.
Avidemux can be easily installed using Synaptic Package Manager. It will be listed under Applications → Sound & Video menu.
-
Launch Avidemux.
-
Click on Open to browse your video files.
-
Select your .mpg file. Click on Open. You’ll be asked: This look like mpeg. Do you want to index it? Answer: Yes!
Indexing will take few minutes, depending on the file siz. It will create a text file in the same folder of the .mpg file. -
Now look at the command buttons in the column on the left and set the parameters as follow:
Video:
-
Click on the arrows and open the dropdown menu. Change codec from Copy to MPEG4-AVC (x264) (sometimes called just MPEG4-AVC)
-
Click on Configure and choose one of the following options in the Bitrate tab:
-
if your video is up to 15 minutes and you want the best quality: Select Encoding mode: Two pass - Average bitrate and type `2000 as Average bitrate: for SD and 5000 for HD.
-
if the size of your file risks to pass the 500MB limit of the free Vimeo account: Select Encoding mode: Two pass - Video size and type 480 as Target video size (MB).
-
In case of anamorphic video go to the Motion & Misc tab and select Sample Aspect Ratio as input.
-
Press OK to close the x264 Configuration window.
-
-
-
Click on Filters:
If your video is interlaced you must now deinterlace it.-
Click on the Interlace tab on your left.
-
Select one of the deinterlace filters and press the + button at the bottom right. The filter will move to the Active Filter panel.
-
Click on the Preview button. Drag the slider of the preview player to check the deinterlace is done properly. If you are not happy with the results, click on Configure and try different settings or try another deinterlace filter.
-
Have a look at the other filters available: you might discover some interesting ones.
-
When you are done, click on Close to leave the Video Filter Manager window.
-
Audio:
-
Click on the arrows and open the dropdown menu. Change codec from Copy to AAC (FAAC).
-
Click on Configure and set the Bitrate to 320.
-
Click on Filters.
-
Check _Resampling (Hz) and write a value of 44100 in the relative text field.
-
Press OK to close the _ Audio Filters_ window.
-
Format:
-
Select MP4.
Click on Save and select your output file. Clicking on the Save button at the bottom will start the conversion. This will take sometime, depending on the filesize.
Resizing
Vimeo recommended resolutions are: 640x480 for 4:3 SD video, 640x360 for 16:9 (wide) SD video, and 1280x720 for HD. In particular to enjoy the beauty of the HD Vimeo quality you need to upload a video with exact resolution of 1280x720 pixels. Unless your video has already one of those resolutions, you need resizing. That can be tricky especially if you have weird resolutions just like I have (1056x704).
You can resize with ffmpeg. Note that the padding commands have changed in ffmpeg since Ubuntu 11.10.
For HD files with resolution close to 1280x720 (e.g.: 1056x704)
ffmpeg -i 'file.mp4' -acodec copy -sameq -vf scale="-1:720",pad="1280:720:(ow-iw)/2:(oh-ih)/2" Vimeo720p.mp4
For SD 4:3 (normal) files
ffmpeg -i 'file.mp4' -acodec copy -sameq -vf scale="640:-1",pad="640:480:(ow-iw)/2:(oh-ih)/2" Vimeo4:3.mp4
For SD 16:9 (wide) files
ffmpeg -i 'file.mp4' -acodec copy -sameq -vf scale="-1:360",pad="640:360:(ow-iw)/2:(oh-ih)/2" Vimeo16:9.mp4
|
|
The command -vf scale="-1:360" will scale the resolution (up or down) to fit the target size (width:height). One dimension is given. The -1 value asks ffmpeg to calculate the other dimension preserving the proportions of the video. If needed you can swap the given dimension with the one to be calculated. |
You can upload the resulting file to Vimeo.
How to render your project for your friend’s Mac computer
To show your masterpiece to your friend you must render your project to a format playable on his/her computer.
Method one: mymasterpiece.mpg
Apple QuickTime Player has no DVD decoder (MPEG-2 decoder) by default. It is an add-on sold separately. However most computers with a DVD player device have also the MPEG-2 decoder installed and are able to play DVD-compliant files. For instructions on rendering your project into DVD-compliant format, see How to render your project to DVD-compliant format. This method ensure a good quality.
Method two: mymasterpiece.mov
You can re-encode your video file into the QuickTime format using ffmpeg, a command line program.
The package available in Synaptic doesn’t support the encoding of AAC audio codec, so you need to compile ffmpeg yourself. For instructions on compiling ffmpeg from source code see this this dedicated page.
To convert your file use the following command.Replace mymasterpiece.ext with the filename and the extension of your video.
ffmpeg -i mymasterpiece.ext -sameq mymasterpieceformac.mov
Method three: mymasterpiece.ogg
Tell your friend to download (here) and install the current stable version of Xiph, the free QuickTime Component that makes any QuickTime-based application be able to play Ogg Theora/Vorbis encoded files. For instructions on rendering your project into OGG Theora/Vorbis format, see How to render your project to OGG format.
Method four: mymasterpiece.ogg
Make your friend happy and tell him/her to download (here) and install VLC, the open source media player that support virtually every video and audio format. S/he will be very grateful. You can then render to any format. DVD-compliant files have a good quality but quite a big size. I recommend OGG: it’s an open format, you still get reasonably good quality but with a smaller file size. For instructions on rendering your project into OGG Theora/Vorbis format, see How to render your project to OGG format.
How to render your project for your friend’s Microsoft Windows computer
To show your masterpiece to your friend you must render your project to a format playable on his/her computer.
Method one: mymasterpiece.mpg
Windows Media player has no DVD decoder (MPEG-2 decoder) by default. It is a plug-in sold separately. However most computers with a DVD player device comes with the MPEG-2 decoder preinstalled and are able to play DVD-compliant files. For instructions on rendering your project to DVD-compliant format, see How to render your project to DVD-compliant format. This method ensures a good quality.
Method two: mymasterpiece.avi
You can re-encode your video file into a format supported by Windows Media Player using ffmpeg, a command line program. This methods will slightly decrease quality and increase size. The resulting file format is not supported in Cinelerra.
Install ffmpeg. In Ubuntu, just open a terminal and type:
sudo apt-get install ffmpeg
Copy and paste in the terminal the following command. Replace mymasterpiece.ext with the filename and the extension of your video. Press ENTER to start the encoding.
ffmpeg -i mymasterpiece.ext -vcodec msmpeg4v2 -sameq mymasterpieceforwin.avi
Note: If you have compiled ffmpeg and extended the codec support (see this dedicated page), you can use also the following command:
ffmpeg -i mymasterpiece.ext -vcodec msmpeg4v2 -acodec libmp3lame -sameq mymasterpieceforwin.avi
Method three: mymasterpiece.ogg
Tell your friend to download (here) and install the current stable version of Directshow filters, the free plug-in that makes Windows Media Player be able to play Ogg Theora/Vorbis encoded files. For instructions on rendering your project into OGG Theora/Vorbis format, see How to render your project to OGG format.
Method four: mymasterpiece.ogg
Make your friend happy and tell him/her to download (here) and install VLC, the open source media player that support virtually every video and audio format. S/he will be very grateful. You can then render to any format. DVD-compliant format has good quality but quite a big size. I recommend OGG: it’s an open format, you still get reasonably good quality but with a smaller file size. For instructions on rendering your project into OGG Theora/Vorbis format, see How to render your project to OGG format.

