

NOTE: This website is alive and growing.
Cinelerra basics in 30 minutes and 10 steps
Table of Contents
This page will guide you through a quick but complete video editing process in Cinelerra.
It will suggest where it is advisable to learn more.
It assumes you have already installed Cinelerra.
Step 1: Get media
Click on the DOWNLOAD link below and select Save File in the Firefox Open file window to download an archive of media ready to be edited.
DOWNLOAD (the archive is only about 260KB in size and it will take just few seconds to download)
Right click on the SourceFiles.tar archive icon and select Extract here from the pop-up menu.
You now have a SourceFiles folder containing the media you need for this quick trial.
|
|
In real life you rarely have your media ready: all the footage needs to be captured from your camera, some images need to be resized, some media need to be converted to a format supported by Cinelerra and easy to edit. To know more see the page Get media ready. |
Step 2: Adjust settings
The quickest way to adjust Cinelerra settings is downloading the configuration file I prepared just for you and saving it in the .bcast folder.
-
Make sure you have no instances of Cinelerra open.
-
Open a terminal
-
Copy and paste one of the following loooong commands, depending on your standard:
PAL:
wget http://www.g-raffa.eu/Cinelerra/HOWTO/Cinelerra_rc-PAL.tar.gz && tar xvf Cinelerra_rc-PAL.tar.gz && mv PALCinelerraSettings/Cinelerra_rc .bcast/Cinelerra_rc && rm Cinelerra_rc-PAL.tar.gz
NTSC:
wget http://www.g-raffa.eu/Cinelerra/HOWTO/Cinelerra_rc-NTSC.tar.gz && tar xvf Cinelerra_rc-NTSC.tar.gz && mv NTSCCinelerraSettings/Cinelerra_rc .bcast/Cinelerra_rc && rm Cinelerra_rc-NTSC.tar.gz
This operaton creates in your home directory a directory called PALCinelerraSettings or NTSCCinelerraSettings. Inside, you have a README file that explains the changes I’ve made just for you.
If you have time to waste, you can also perform this operation with no command lines. For instructions see the Adjusting settings page.
|
|
To know more about the .bcast folder see .bcast in the Glossary and check the Troubleshooting page. To know more about the settings that need to be adjusted see the Adjusting settings page. |
Step 3: Open Cinelerra
Step 4: Load files in Cinelerra
-
Go to File→Load files… to open the Load dialog.
-
Browse the folders in your home and open the SourceFiles folder.
-
Click on the .mp3 file
-
CTRL+click on all the .png files so to highlight all 6 source files.
-
Make sure the Insertion strategy is Create new resources only.
-
Apply by clicking on the green thick mark. Your source files will appear in the Resources Window.
|
|
When you load a file, Cinelerra only creates a reference to that source file. No media file is actually moved. There are many ways of loading files, one for every need. To know more see the Loading media page. |
Step 5: Arrange edits in the timeline
Drag the .png files from the Resources window and drop them onto the Video track in the timeline.
Drag the .mp3 file from the Resources window and drop it onto the first Audio track in the timeline.

Playback your video using the navigation controls in the control bar of the Program window or in the Compositor.
Drag and drop your images around the timeline, till you are happy with their order.
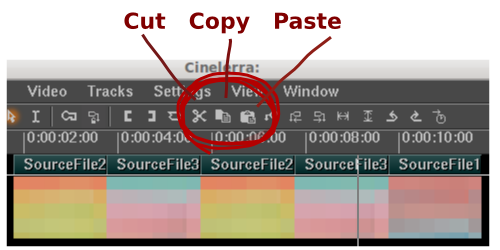
You can also cut, copy and paste your images. Just double click on the picon to select the image. Use the Cut or Copy buttons.
Set the insertion point at desired position on the timeline and click on the Paste button.
|
|
In real life you can use more audio and video tracks. Always make sure your timeline has the tracks you want. To learn how to add or remove tracks see HOWTO add and remove tracks. Cinelerra has more than one editing mode. To know how to edit beyond the _Drag and drop functionality see the First editing page. |
|
|
If you are asking yourself a lot of questions about the copyright of the tune recorded in the .mp3 file, have a look at the Happy Birthday to you entry on Wikipedia. |
Step 6: Tweak edits in the timeline
You can adjust the length of the edits of your masterpiece.
Pose the mouse pointer so close to the right end of the edit to make it change shape. Drag the edit boundary forward or backward to lengthen or shorter the edit duration.
Think to it as expanding or contracting the edit (pushing or pulling its border from inside) in the direction the time goes.
|
|
This operation is called trimming. See the Manual to discover all the power of the trimming operations. |
Step 7: Add transitions
I’m sure you want to add fancy transitions between edits. This seems to be the favourite operation of newbies of all ages.
Follow this trail to happiness:
-
Select the Video transitions tab in the Resources window.
-
Drag the most stunning transition icon and drop it over the border between two edits. The icon will move with your mouse pointer and will be dropped on the timeline, along with a little brown bar.
-
Playback your transition and enjoy it! You can use different transitions and make a cheerful carousel for your pleasure and your grandchildren enjoyment.
|
|
Transitions can be edited. You can set duration or change the behaviour specific for every single transition. You can even build your own transition. To know more see the Transitions page. |
Step 8: Add a title
Your movie is nearly finshed. You just need an opening title.
First make some space for it.
-
Just double click on the first image and select Paste silence from the Edit menu.
Now add the Title Video Effect on the timeline.
-
Double click on the blank space you just created.
-
Drag the Title icon from the Resources window and drop the white outline of the Title effect onto the selected area of the timeline, in the upper part of the track, where the video is represented by picons. Once dropped, the Title effect is shown as a brown bar at the bottom of the track.
-
Open the titler dialog box by clicking on the magnifier that is on the effect brown bar.
-
Write your title in the main field. To watch it click on the timebar to set the insertion point inside the area covered by the effect.
|
|
To know more about the concept of silence in cinelerra see How to understand SILENCE. You can easily add scrolling credits at the end of your movie. You can change colour, font, size, position of you titles. You can even add effects. To know more about the potential of the title effects see the Titles page. |
Step 9: Save
Saving is extremely easy in Cinelerra. Just like in all programs, select Save from the File menu.
Understanding what you have saved, though, is not as easy. It is an intesting adventure to grokk one of the basic concept of digital video editing: the EDL.
When you edit text in a text editor you end up with text. When you cut and paste paper picture from a newspaper you end up with a paper collage. When you mix edible flour, yeast and sugar you end up with edible biscuits.
Cinelerra is different: you cut and paste video and you end up with text.
You don’t believe me? Open the just saved Cinelerra project with a text editor and watch! Right click on the project filename and select Open with gedit text editor. You are now facing an EDL.
EDL stands for Editing Decision List. It’s a document very similar to the shopping list you write on scrap paper before going to the supermarket. It’s a list that collects all your desires/decisions about how you want your movie: which clips to use, starting from point x to point y, which music to add and when and so on. Note that Cinelerra didn’t produce any video file. No videos are created.
 Shocking, isn’t it? But what’s the point of having Cinelerra working not as a videomaking machine but rather as a typewriter?
Just like the sculptor make his draft on paper before carving on marble, Cinelerra allows you to work on a preview, editing, refining, undoing, testing, redoing, changing your mind endless times before making the real video file.
That’s why a Cinelerra file is called project.
Just like the sculptor papers, the quality of the preview is a little inferior to the final one.
When you are sure you are happy with your project, then you can create a real video file. This operation is called rendering.
Step 10: Render
Cinelerra can make your dreams come true. She can make a real videofile reading and executing the decisions about editing you wrote on the list. She won’t destroy your original clips. Instead she will copy the relevant portion of them and process them as you ordered. This is called non-destructive editing. It’s good to have all your source files safe and sound for future reuse. On the other hand, though, a lot of disk space will be used.
To render your project:
-
Open the Render… dialog from the File menu.
-
Enter the filename for your video, without the extension (Cinelerra will add it automatically)
-
Select OGG Theora/Vorbis from the dropdown menu of the Format field.
-
Make sure both Audio and Video checkbox are checked.
-
Make sure the Insertion strategy is Insert nothing.
-
Apply and follow the progress of the rendering operation at the bottom of the Program window.
 Sit and watch your masterpiece in full quality. Congratulations, Grandma!!

